Engineering drawings follows two type of angle of projection: First angle of projection and Third angle of projection. In first angle of projection, object is assumed to be kept in the first quadrant, see Figure 1 and viewer viewing the object from the direction shown in Figure 1. As the object is kept in the first quadrant, its views projections are on the planes as shown in Figure 1. Now, on unfolding the planes of projections, the front view appears at the upper side and the top views appears at the bottom side in a drawing. Also, the right side view appears at the left and left side view appears at right side of the front view, see Figure 2.
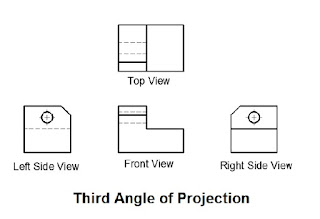
Similarly, in third angle of projection, object is assumed to be kept in the third quadrant, see Figure 1 and the front view projection appears at the bottom and top view projection appears at the top side in the drawing. Also, the right side view appears at the right and left side view appears at the left of the front view, see Figure 3.
Similarly, in third angle of projection, object is assumed to be kept in the third quadrant, see Figure 1 and the front view projection appears at the bottom and top view projection appears at the top side in the drawing. Also, the right side view appears at the right and left side view appears at the left of the front view, see Figure 3.
Figure 1
Figure 2
Figure 3


No comments:
Post a Comment